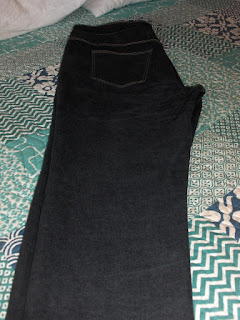
Tada! complete at last. Morgan Jeans from Closet Case Patterns.

I had made one pair a couple of months ago and found they just sat too low for my taste. I was constantly tugging at the waist to pull the pants up and they felt as if they were falling off. I think this is because I have never worn low-rise pants and they just feel wrong on my body.
Rather than buying the Ginger Jeans to get the higher waist, I thought why not just add 1" to the waist on front and back and see if that works? well it did, although I found out that I didn't need 1", just 1/2" was enough to make the difference I wanted. I also fitted this pair more snugly to counter that falling-down feeling and made the waistband tighter as well. Success!

I made a big goof on the zipper; I opted to use my usual method for applying a zipper rather than the jeans type method in the pattern. This resulted in the zipper being closer to the edge of the fabric that it should be, and I didn't take this into consideration when applying the waistband. If you trim off the waistband even with the edge of the pants as instructed, there is nothing where the buttonhole is to fasten a button to. So I had to fudge here and add a piece of fabric to one end of the waistband in order to have a piece of waistband to sew on a button. Dumb mistake, but no one will ever see it so I don't really care. I will not do this on the next pair however, and I will use the method in the pattern.
Although the pattern calls for non-stretch denim, I didn't see why using a stretch denim would make that much difference. So my fabric is a black stretch denim that has a sand-washed feel. So nice to the touch. I did interface the waistband, but not the facing, in order to prevent waistband stretch throughout the day. I have noticed on most of my stretch pants, that they loosen up with wear and have to be washed to get back to their first fit. So interfacing on the straight of grain should prevent that from happening. I also used the method that Lladybird showed in her video on jean making, where she sews the waistband facing to the inside of the pants, flips the band over and top-stitches the waistband itself on the outside. This prevents any stretching that occurs and you don't get any ripples in the band on either side by doing it in this order.
These jeans are a lot of work, no doubt about that. The most time-consuming task is re-threading the machine and doing the top-stitching. Sometimes my machine just didn't like that heavy top-stitching thread and it would fray, which meant cutting it back and re-threading the machine. And it's hard to get that thick thread through the eye of the needle. My Bernina doesn't have a needle-threading capacity so I am left eye-balling and trying to grab that little thread coming through the back. But I figured if I was going to all the trouble of making jeans, I should go the extra distance and do the top-stitching too. I'm glad that I did.

One thing I have found with these jeans is that you need to customize the back pockets. I think mine are too large and also sit too low. This could be because I added extra to the rise of the pants, but I will trim off 1/4" on the bottom and sides of the pocket for the next pair. But that might be a while off, I am not really in the mood to make another pair too soon.
I'm glad they are done and I will certainly wear them. It is the wearing that will tell me whether it is worth making another pair or just buying jeans from the store.
It was really nice to brush out the machines, oil them and put in new needles for the next project: a summer blouse for granddaughter Hannah in a cute mustard yellow print. That colour seems to be the rage this spring, I am seeing it everywhere. It kind of grows on you. But I have to admit when threading the machine with regular thread, it just felt so skinny and flimsy after the denim top-stitching thread.


