Friday, April 19, 2019

New Knitting Project


A pocket lining for a cardigan that I have just started. The pictures are not great, but this yarn shows up the stitches beautifully. It is 24/7 cotton from Lion Brand.  It is the recommended yarn for the pattern.


Photo taken with flash, but there is too much glare.


Photo taken without flash, you can't win!  However, this photo does show the colour much better. It is called navy but it is brighter than navy, but not a royal blue. It is a very intense rich blue, I love it.

This is the pattern, it is the Textured Cardigan by Jennifer Owens. I came across it in the spring/summer issue of Knit Simple magazine.


It is a fairly simple pattern, with alternating rows of knit and purl with a waist inset of a lace pattern. 

I am also knitting an Aran cardigan but it is slow going, and I need something else that is quicker and easier to knit while watching a movie. I have been working on the Aran pattern for several months now and I still have 1/3 of one front plus both sleeves to knit. So it will be a while yet before I see the end of that pattern. Definitely a need for something that works up quicker.

The yarn is a lovely 100% cotton mercerized yarn. It is listed as worsted weight, but it is not quite as thick as worsted, but it is thicker than double knit weight. The yarn is highly twisted so it doesn't come apart as you knit, and the mercerizing process gives it a sheen that is quite appealing. 


Friday, April 12, 2019

McCalls 7889


This is a blouse for grand-daughter Hannah who is just about to turn 16. 
The pattern is McCalls 7889.
                             Image result for mccalls 7889
 I bought the pattern for the dress, but made it first in the blouse version to check the fit. This pattern is very loose-fitting everywhere but the waist. So you can size down considerably but you must check the waist fit as the tucks, 12 in all, bring that waist in about 12 inches in total.


The fabric is 100% cotton voile purchased at Fabricland in Pembroke. I love that mustard yellow colour that seems to be everywhere this spring. Hannah has a sweater in this colour and it looks great on her.


Her only request was to take in the sleeves which jutted out "like a Star Trek costume" she said.
So I folded under a tuck on the inside of the top of the sleeve, so the sleeve now has more of a cap shape. 

Now, looking for a lovely drapey striped fabric to make her the dress.


Saturday, April 6, 2019

Morgan Jeans


Tada!  complete at last. Morgan Jeans from Closet Case Patterns.


I had made one pair a couple of months ago and found they just sat too low for my taste. I was constantly tugging at the waist to pull the pants up and they felt as if they were falling off. I think this is because I have never worn low-rise pants and they just feel wrong on my body.

Rather than buying the Ginger Jeans to get the higher waist, I thought why not just add 1" to the waist on front and back and see if that works?  well it did, although I found out that I didn't need 1", just 1/2" was enough to make the difference I wanted. I also fitted this pair more snugly to counter that falling-down feeling and made the waistband tighter as well.  Success!

                                       
I made a big goof on the zipper; I opted to use my usual method for applying a zipper rather than the jeans type method in the pattern. This resulted in the zipper being closer to the edge of the fabric that it should be, and I didn't take this into consideration when applying the waistband. If you trim off the waistband even with the edge of the pants as instructed, there is nothing where the buttonhole is to fasten a button to. So I had to fudge here and add a piece of fabric to one end of the waistband in order to have a piece of waistband to sew on a button.  Dumb mistake, but no one will ever see it so I don't really care. I will not do this on the next pair however, and I will use the method in the pattern.

Although the pattern calls for non-stretch denim, I didn't see why using a stretch denim would make that much difference. So my fabric is a black stretch denim that has a sand-washed feel. So nice to the touch. I did interface the waistband, but not the facing, in order to prevent waistband stretch throughout the day. I have noticed on most of my stretch pants, that they loosen up with wear and have to be washed to get back to their first fit. So interfacing on the straight of grain should prevent that from happening. I also used the method that Lladybird showed in her video on jean making, where she sews the waistband facing to the inside of the pants, flips the band over and top-stitches the waistband itself on the outside. This prevents any stretching that occurs and you don't get any ripples in the band on either side by doing it in this order.

These jeans are a lot of work, no doubt about that. The most time-consuming task is re-threading the machine and doing the top-stitching. Sometimes my machine just didn't like that heavy top-stitching thread and it would fray, which meant cutting it back and re-threading the machine. And it's hard to get that thick thread through the eye of the needle. My Bernina doesn't have a needle-threading capacity so I am left eye-balling and trying to grab that little thread coming through the back.  But I figured if I was going to all the trouble of making jeans, I should go the extra distance and do the top-stitching too. I'm glad that I did.

                                        
One thing I have found with these jeans is that you need to customize the back pockets. I think mine are too large and also sit too low. This could be because I added extra to the rise of the pants, but I will trim off 1/4" on the bottom and sides of the pocket for the next pair.  But that might be a while off, I am not really in the mood to make another pair too soon.


I'm glad they are done and I will certainly wear them. It is the wearing that will tell me whether it is worth making another pair or just buying jeans from the store. 

It was really nice to brush out the machines, oil them and put in new needles for the next project: a summer blouse for granddaughter Hannah in a cute mustard yellow print. That colour seems to be the rage this spring, I am seeing it everywhere. It kind of grows on you.  But I have to admit when threading the machine with regular thread, it just felt so skinny and flimsy after the denim top-stitching thread. 


Tuesday, March 19, 2019

Kalle Shirt dresses/blouse


Last summer, I decided to try the Kalle Shirtdress from Closet Case patterns.  My daughter in Texas had made one and we both came to the same conclusion:  one great pattern!


The one above was made dress length using a printed cotton that was in my stash. I think I bought it at a quilting store in Nova Scotia, but I really can't remember. The cotton is a wee bit on the thick side for this dress, but it works. My only reservation is that the wrong side of the fabric looks too different from the right side and that shows when the collar is open and also on the hemline. Not a big deal, but something to keep in mind.  You want this dress to be flowy and light. 


The second version above was also made with a quilting cotton bought at Stedmans' here in town. It is slightly lighter in weight than the black version and the contrast between right and wrong sides is not quite so remarkable.

Heather takes a somewhat simple design but gives it some quality finishing touches that make it different from other shirt dresses. For one thing, all the seams are finished as flat felled seams, so there are no raw or serged edges inside the dress. She finishes the sleeve with a kind of cuff that mimics the angle of your upper arm so that it doesn't stick out when wearing it. A little thing but important.  The thing I like the most is the hemline, which is not serged and topstitched, but is bound with self bias. This takes more time to do, but gives the hem a weight that it wouldn't have otherwise and makes it hang very nicely.  Again, a nice finishing touch.


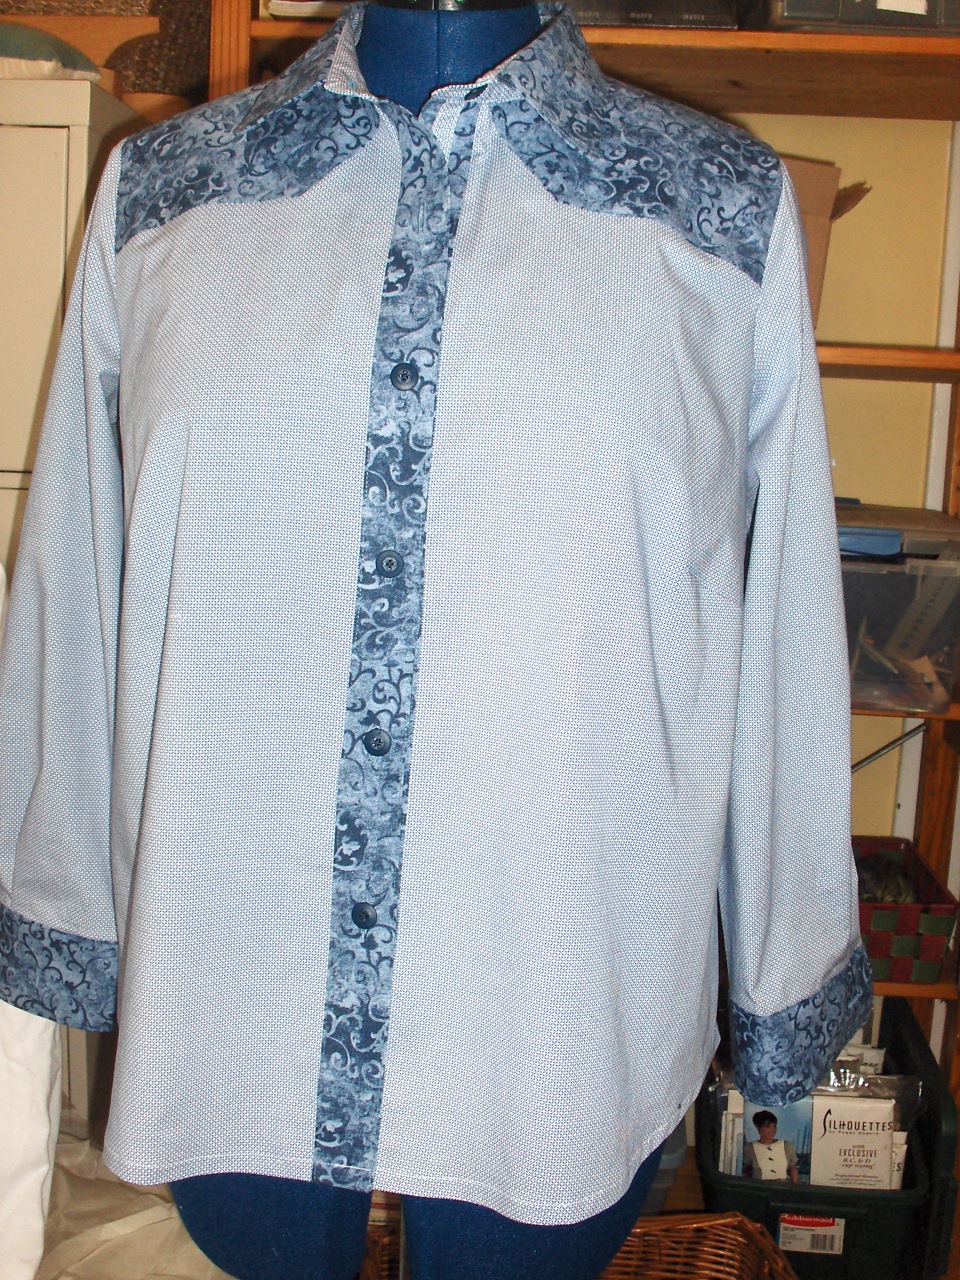
The third version I made is the blouse, which is a very cropped shirt. I lengthened it by 3" in both the front and back so that it comes below my waist which is non-existent at this point in my life. Again, Heather takes the pattern one step further and finishes the hem with a deep 2-3" facing; once again this is a fine finishing technique and gives the hem weight that makes the shirt hang very nicely. This version I made up in a shirting bought from Blackbird Fabrics last summer. It is the perfect weight and I highly recommend the shirtings that Blackbird carry; they are fine cottons, just perfect for shirts, blouses and shirtdresses. They also get some cute prints, the one I used has an all-over pattern of little bicycles.

I also have a rayon with pink flamingos that I bought last year from Fabrics.com and I think I might just have enough for another Kalle dress. If not, it might become the tunic length version.

This pattern is written up all over the internet and it now has the honour of being copied by MimiG, Mimi G's shirt and wide-legged pants, - a high honour indeed. Mimi's version is just the cropped shirt length which she finishes with a deep facing as well, but her version has set-in sleeves which give a slightly different look to the shirt. I bought that pattern when I was in Texas last week and will give it a try and can then compare.

But the Kalle shirt is great, a few tweaks and you have a cropped shirt, a tunic, or a shirtdress. Heather also has a long sleeve add-on on her website, if you want to lengthen the sleeves. Personally, I think the pattern is great just the way it is.

I think my daughter has made 2 Kalle dresses now and 2 cropped shirts. Her tastes run to more dressy-type dresses, but the Kalle is a nice casual option for daily wear. It is fun to be sewing along with my daughter and comparing notes on different patterns. She has made the Ginger jeans four times, I think, and she has only been sewing a little over a year. I told her that I am going to make the Kelly Anorak next and she wants my opinion on it as she thinks it might be the perfect casual coat for their Texas winters.

Before leaving for Texas, I bought wine red cotton poplin and a red/navy/green plaid flannel from Mood Fabrics to underline the Kelly, but I am thinking I would prefer a bright crazy cotton as the underlining, something fun to see when you take the coat off.

And remarkably, I found some lovely fabrics at Joannes' in Tyler Texas. A gorgeous 4 ounce denim that is 100% cotton. Hmm, another Kalle?  And a beautiful deep red linen/rayon blend.  My most favourite fabric in the world is linen and, when it is combined with either cotton or rayon, it is even better. Don't know what that will be, but I have managed to increase the stash with some lovely fabrics.  I tend to buy printed fabrics and these two are solid colours, which are more versatile in a wardrobe. My problem is that I just love prints and love to sew something that is printed. I find solid colours boring to sew, but these two are lovely fabrics and will be a pleasure to handle.


Thursday, January 24, 2019

Mail order arrived!


Woohoo!  my fabric order arrived from BlackBird Fabrics.  I have to tell you that this is a great little Canadian company with wonderful taste in fabrics and great service.  I am so thrilled that they are here in Canada, which means that any order over $100 qualifies for free shipping.

www.blackbirdfabrics.com

Pop over and see what they offer. Everything I have bought from this company has been absolutely first-rate.  And if you have a friend who sews, combine your orders and get the free shipping. I want to send people over to them, as they need to stay in business!

Ordering from the US is so pricey. I just ordered two samples, just samples, and they cost me $3 for the samples, plus over $16 US for shipping!  It is prohibitively expensive to order from the US, unless you really want something.  And I will order these fabrics, but I was a little shocked to be charged that much for an envelope containing two samples. That should go as letter mail and should only cost $2 in postage. 

From having my own mail order business, I know that the shipping is the thing that does you in. And I had to subsidize my customers' orders heavily because no one would order a thing if they had to pay what the shipping actually cost. I do want these companies to stay in business, because for people like me living in rural areas, we simply don't have access to good fabric.  Once in a while, I will get into Pembroke and then I pick up necessities at Fabricland but the choice of good dressmaker fabrics is limited.  Sometimes there are some gems to be had, but the last time I went there was really nothing that caught my eye.  A lot of junky knits in bins, no decent ribbing to be had in the entire store, and not too much up front in the way of eye candy. 

So getting fabrics like these today is simply putting me over the moon. Now I confess that I am suffering from cabin fever, which is very common in these parts in the months of January and February. And I justify my online purchases as therapy for the SAD aspect of my life here.

(SAD = seasonally affected disorder, in other words: you get depressed by the lack of sunlight)

The oatmeal linen is gorgeous, I bought 3.5 metres for a spring jacket. The print is a viscose twill, I bought enough to make a Kalle tunic shirt, and the knit is for a simple tee as my tees seem to have been depleted over the past year.  I am always on the lookout for decent knits to make t-shirts and this one has a lovely texture to it and is just the right weight for a tee.  Some cotton/lycras are a wee bit too heavy and they seem to get stiffer and stiffer the more they are washed. I hope this one will retain its nice hand.

In the knitting area, I have finished a sweater and have to block it and then sew it together.  Always something on the needles!  Can't sit and watch a movie with my hands inactive.


Monday, January 21, 2019

Back to Sewing


I really enjoy reading sewing blogs, but have noticed that many bloggers are quitting and just using Instagram or Pinterest only. I don't like those forums, as there are only pictures and not much written text so you can't really get to know much about the items.

I do hope that sewing bloggers continue to record their sewing efforts. If not, what will I have to read?

I have been sewing but have been remiss about blogging my finished items.

Since the summer, I have made a Kwik Sew classic shirt from some lovely quilting cotton I bought at Dolans' in Renfrew. It is a black background with tiny leaves in mustard and soft purple (what I would call mauve).  Years ago, I read an article in Threads about coordinating your sewing by using a piece from one finished item and incorporating it into the next garment, thus tying them all together. The result was a kind of artsy-type wardrobe, not to everyone's taste, but an interesting concept.  This cotton has me thinking that I should use the remains of the quilting cotton in another garment, and I can see a shirt-dress that is colour-blocked with this print being used as the border on a solid colour dress.
Hmm, we shall see if I actually get to it.

Then I sewed a Coatigan, at least that seems to be what this sweater-coat garment is being called. I found an independent pattern featured in a blog, but it was from Australia and the printed pattern cost $35 plus the price of shipping. Whoa - way too expensive. I found a very similar pattern in McCalls.

                                                 Image result for McCalls 7476
I ordered a sweater knit from Fabric.com and it is sitting in a box waiting to be cut and sewn. In the meantime, I wanted to make a muslin first and used some black French terry from the stash. The terry has much more body to it than the sweater knit and the result is more like a coat. In fact, because of the colour, I am calling it my "funeral coat". I will be ready for any funeral I have to attend in the near future. As a result of making the muslin, I am going to add 1" to the side seams for better closure and I will shorten the bodice 1" to bring the bottom of that V up higher on me. After all, I am short and the pattern would have been designed for someone 5" taller than me.

Next, I ordered 4 patterns from Grainline Patterns, which came in record time. They have really good service. I made up the Lark Tee in a knit from the stash and it is looking pretty good. I am going to cut down the shoulders and neckline and armscye to a smaller size as they are too big on me, but the body is just right. I can also lose some of the length in both sleeves and body, although I prefer to have the length there before hemming. I really dislike t-shirts that end up being too short, and I have found that I like a deeper hem than most patterns allow for. From the Loes Hinse line of patterns, I have found that a 2" hem on the bottom of a knit top gives it nice weight and it hangs better.

Then I sorted out my pile of fabrics that seem to accumulate in my sewing area. I found a Kalle shirt cut out in a cotton print that I love. I think I bought it from Blackbird Fabrics last spring.  Over the summer, I made 2 Kalle shirtdresses and cut out this blouse. I lengthened the cropped version about 3" in front and 5" in back. Cropped tops on a woman my age are definitely OUT.  This is a lovely pattern, it is so well drafted and the instructions are great. Everything goes together so well, it is a real pleasure to sew.

I do finish my pockets differently, I sew the top facing over to the right side, then flip it over, which brings the sides in, then press and topstitch in place. I also use the Islander burrito technique for the yoke rather than the one that Heather Lou uses. I don't like rolling all that fabric up into a little bundle; too many creases for my taste. Margaret Islander's technique does one side at a time, and there is no bunching up of the body of the shirt inside the yoke.

Now that I am making the Kalle again, I want another shirtdress in it.  I have a teal green cotton blend in the stash that I think would be good. I have to force myself to sew solid colour garments; I am simply drawn to prints time and again. But solids have much more wearability than prints.

Also in January I made a pair of Burda pants from some black rayon/poly/lycra from the stash. So it has been a rather productive time here in my sewing room. I will try and get some photos up here shortly.


Thursday, August 9, 2018

Dress for Sarah


A dress for  Sarah, who turned six in June. She has been asking me for a dress since I made two  for her sister Hannah.


The pattern is Simplicity 2377, view E made in size 7.

                          Image result for simplicity 2377


Saturday, April 7, 2018

April Sewing


A recent trip to Texas netted some fabric that was turned into a dress for grand-daughter Hannah. She is 14 about to turn 15 this month and fits a size 12 pattern perfectly. I don't understand these bloggers who make size 4 or 6 for themselves when they can't possibly measure that small. I mean Hannah is a very slender teenager and her measurements put her exactly into a size 12. I know that some patterns have more ease than others, but generally I have found that they are in the ballpark and only require minimal tweaking to make them fit well.

                                               
The pattern for this dress is Butterick 6331; it has a vintage look to it and could be a little too cute, but hopefully she will wear it. I am making the same pattern again in a soft printed chambray, that version will be collarless and sleeveless plus it will have the full skirt. So it will look more like a sun-dress.
I figure that since version 1 fit her so well, that I should make a second version right away before she grows. The only changes I made to the pattern were to bring the neckline in slightly (it looked very wide to me) and I took in the side seams 1/4" directly under the arms to eliminate gaping there.

Second version of Butterick 6331 in a lovely printed denim chambray. Instead of gathering the skirt, I pleated it so that it would not be a full waist. Very few people feel comfortable in a gathered waist I find. Pleats give you the exact same circumference in the skirt but the fullness is controlled at the waistline.


These two fabrics will be made into a tiered dress for grand-daughter Sarah who is five, but a very tall five. The pattern is Simplicity 2377, which I picked up at Joanne's in Texas. Simplicity patterns aren't sold in Canada any longer. The reason given is that they don't print the instructions in French and Canada insists on all products being sold in the two official languages. Stupid I say, as the percentage of people who speak French in Canada is not that great. There are probably more people who speak Chinese than speak French now.

I will make her a size 7, as she is growing like a weed. She is already wearing Hannah's old clothes from when Hannah was 8 years old. I had the plaid in my stash and picked up the batik pink quilting cotton to coordinate with it. Sarah's favourite colour of course is pink, as is the case for most little girls.


And the yellowy cotton above is going to be a gardening blouse for me, using Vogue 8689.  My daughter in Texas made this pattern up for her very first sewing project and it looked great. She made it first in a cotton/linen blend, then again in a cotton lawn print. She said the second version looked like scrubs so she took off the sleeves and bound the armholes. And that blouse looks wonderful. She ties the ends in a knot and wears it with a very cute heart-printed blue denim.

I also bought three fabrics from Blackbird Fabrics last week. One is a stretch twill in tan to make into pants, and there are two lengths for summer blouses. One is a double gauze in navy that I think will be very interesting to work with. 


Wednesday, February 14, 2018


Photos from snowy northern Ontario

Tekla, now 23 weeks old

Standing on the back deck

Those perky ears

She blinks in the bright sunshine


Saturday, January 20, 2018


So long since posting here, life has been busy with all sorts of new things. Adjusting to a new house, to a new community, to a new weather system and also to a new puppy.

But I have made some living room curtains. There is another window that needs another set, but this is enough for this week. I so dislike sewing home decor items, I find them incredibly frustrating for some reason. The quantity of fabric, the weight of it, the need for exact measuring, and then the task of mounting the hardware on the wall. Neither one of us is very practical and it takes a major effort to screw in brackets for the curtain rod. But we managed today to get this one up and so I felt obliged to finish the first pair of curtains and get them hung. The brackets need to be extended a little further as the curtains get stuck on the blind hardware that is also there, but that is a minor job.


I will so enjoy getting back to garment sewing. A zillion pieces of a pattern is far less intimidating that the 94" of curtain lengths that I was dealing with in these.


This is Tekla, a Norwegian elkhound. She is now 17 weeks old. We got her at 10 weeks, and she has been quite the handful. We have always had dogs from their young puppy age, but I don't recall any being quite so difficult to train as this one. Of course, having a UTI for two weeks at Christmas didn't help as she had to go out every 30 minutes and there were many accidents in the house. But she has a wonderful loving nature and is incredibly curious and energetic. And she will keep us exercising and walking which is so necessary in this stage of our life. 

Other than that, I am eagerly awaiting the arrival of spring. But before that, we are heading south to visit our daughter and her family in Texas. This is the daughter who took up sewing 10 months ago, and has successfully completed over 50 items of clothing so far.  This includes 4 bras and 2 pairs of jeans, there is no stopping her. She has discovered the wonderfully creative world of sewing and her husband even bought her a serger for Christmas. She made a fleece dog coat right off with it. Next are t-shirts and sweatshirts for the kids; the oldest boy said that he was looking forward to something without buttons. 

 
This is Tekla when we first got her, about 11 weeks old.


And this is her when she takes a nap; she often rolls over onto her back and is out for the count. Only lasts about 15 minutes though, then she is up and ready to go again.

Of course, this has severely limited the amount of sewing that I get done. But every thing has its season.


Saturday, July 15, 2017

Sewing Swimwear


For some reason, I got it in my head that I wanted to make a bathing suit. The idea took over and I searched for a pattern that would be suitable for this aging body. Aha! Butterick 5795 popped up and, although the photos were not that helpful, the line diagrams showed a "swimdress" that I could see myself wearing. 

                                        Image result for butterick 5795

The pattern has a lot of options: a crossover swimsuit, a tank top in two lengths with a swimsuit bottom, a skirt to wear over the bottom if desired, and a cover-up dress that looks quite good too.

I found this print at our local fabric store, the fabric is heavy duty nylon/lycra and it was pricey, especially when I discovered that I had cut the bottoms on the wrong grain and had to purchase more. In actual fact, I then found out that it was only the lining that I had cut wrong and the lining restricted the stretch of the print; once I cut lining with the correct stretch, everything was fine. 


I made the shorter version of the swim dress, the bottoms are pinned to the dress form because I couldn't get them up over the bottom of the stand without losing the feet (of the dress form that is). 


Rather than use the directions for the lining, I cut the front double and zigzagged purchased bra cups in the correct position. Then I simply sewed the lining to the edges of the front and treated them as one layer. That is why you can see the side seam pulling to the front; it is the elastic sewn underneath the bra cups that pulls in the lining which is attached at the side seam. It doesn't do this when I am wearing it.


This is the back view; it has a slight flare to it. The longer version would be more flared. When I tried this on, I actually thought it would make a very nice princess line dress in a knit with some body. I may actually try one later on, but I would raise the neckline and finish it with binding or a facing.  I think I would add sleeves to it as well. 

All in all, I am quite pleased with this swimsuit. Of course, one never really knows until you actually swim in it, because there can be surprises with swimwear. The swimdress may float up and be totally annoying; I should know in two weeks time when we have moved to Ontario and I take my first dip in Lake Kamaniskeg (I can hardly wait).

I have sewn two dresses this summer plus a top, but haven't posted any of that. We are intensely busy with selling this house, packing up and getting ready to leave this province. Thirty-one years is a long time and we are going back to our original province, now that Nick has retired. 

I plan on sewing one more blouse, then the sewing room will be packed up and the machines packed and ready for the big move. 


Friday, May 19, 2017

Moving and Gardening


Preparing for a big move in July or August from Nova Scotia to Ontario. I am thrilled at the fact that we now have a large lot that is great for gardening. The hardiness zone is more limiting, this is zone 3 whereas Halifax is zone 4, but the soil is clay whereas Nova Scotia is rock and more rock, as well as giant tree roots.

So first up, I just had to plant a flowering crab apple tree. So easy to dig a foot-deep hole with this soil, add the sheep manure to the soil, apply the fungus to the exposed roots (apparently it helps the roots to grow and to absorb moisture), add bone meal to the soil as well and then plant. Water generously and I'm done!


Apparently the apple tree in the empty lot next door will provide the cross-pollination required. So I don't have to plant a second apple tree. Which is a bit of a relief, I am rather tired by the effort to plant this one. 

I have also discovered four peonies in one of the garden beds. And the daffodils I planted last fall are just about finished. There is a perfect spot for a clematis vine just by the back deck (feet in shade, tops in the sun), this is something I could never grow in Halifax. I am going to push my luck though and see if I can get a climbing hydrangea to grow here. It is one zone colder than hydrangea needs, but in the right spot it just might make it. 

Next week, it is back to Nova  Scotia to finish packing up the house and then selling it. Once that is done, we will move here permanently. The move will bring us within a 5-minute drive of 7 of our grandchildren which will be great. And travel to Texas to visit the other 3 grandchildren is easier from Ontario than from Nova Scotia. The only drawback is leaving our youngest daughter in Nova Scotia. We will only see her when she takes her vacation and visits us here.


 This is the view of the front yard as seen from the front steps. This is what we see out of our living room window. In the fall, the colours are magnificent with the red maple and the golden leaves of the many birch trees.


This is one angle of the back yard, the lot line defined by large pine trees, which the neighbour emphatically informed me belonged to him. "I can trim the branches if you would like", he said. I replied "they are just fine the way they are." 


The other angle of the back yard. This is the land of sheds, almost everyone has at least one in their yard and often as many as three or four. Provides great storage for wood piles, bikes, snowmobiles, ATVs, boats, and possibly racoons and their young.

Life will be different here. I am looking forward to it. I know that I will miss terribly some things about Halifax and the closest fabric store is an hour's drive away and it's not terribly impressive. I will definitely be shopping online for many fabrics and notions. But life will also be much simpler, living in a town of 1200 people rather than a city of 100,000. There doesn't seem to be that sense of urgency that you feel when you live in a city, always watching the clock because you are on a schedule. I feel that we will be living more in the moment here. 

All in all, a good move we think. As with any major change, there will be a period of adjustment. 
I am very grateful for all the blessings in my life.


Tuesday, April 18, 2017

McCalls 7360


I made this top last spring in a linen printed fabric and was really pleased with it. However, when they tell you to prewash linen 3X, take the advice. The top shrunk after the first wash and is no longer wearable, well not by me.  I made a second version in a black tencel fabric, it is okay but it doesn't really thrill me.  But I still liked the pattern and got it out last week for a third version. This time in a batik rayon in the most gorgeous shades of blue and purple.


I did add more darts to the front from the waist as I found the FBA had made this too loose in the waist area. And perhaps it would be better 1" shorter, but this is good to go. I will hand wash this top to preserve the fabric for as long as possible. If you can get your hands on Eucalan fabric wash, don't hesitate, it is great stuff, you simply swish a capful into a sink of warm water, add the garment and let it soak for 15 minutes or so. Then squeeze it out gently, no need to rinse, and hang to dry. I did this with a rayon blouse from another Batik Butik fabric and I wore it pretty steadily for 8 years.

So another version of this top is up next. This time, I have a drapey fabric that I can't remember where I got it. It must have a lot of rayon in it because of the drape, but I don't think it is 100% rayon. It might be mixed with some polyester or with cotton.


This time, I will make the sleeveless version with the longer back hemline.
Alterations to this pattern include:
Cut size 18
Make a full bust alteration adding 1 1/2" to each front piece, and making a rather large side bust dart
Extend the length of the top by 1" (even though I am short, I find many tops are just too short, I prefer a longer length)
Make the top full button front rather than tab opening. Cut pockets, yoke and front bands on the bias.

My third version shows that I need to raise the end of the bust dart by 1", which will be done on this fourth version. I don't think I have ever made 4 versions of any pattern in my life.

I am finding it difficult to get much extended sewing time in these days, as we are preparing to sell our house with a move across provinces in July. So much to do to declutter the house, which is a four-storey 100-year old home. After 21 years and six people living here, there is a lot to go through and discard, recycle, rehome, whatever. I have been forced to cull a lot of my fabric stash and patterns too, and the local thrift shop has got a lot of these. One woman at the sewing guild said I see you brought your patterns to the Sally Anne. When I checked, they were all gone. I guess there are some sew-ers out there.

Next week will see another driving trip of 1000 miles to Ontario where my husband will lead his last geological field trip of his career. This is a bittersweet time for him, as he has loved teaching and retirement is not coming easy for him.

I am hoping that he will teach at the small college where we are moving, and that he can introduce a new crop of students to the subject that he loves.


Thursday, March 2, 2017

Sewing through the generations


My oldest daughter Rebecca who lives in Texas is learning to sew. And with the internet, there is so much at hand now that we did not have when we started out sewing.

Her daughter Miriam watches mommy sewing and I thought perhaps she might like to try something herself. So I saw a little purse on Amazon, a hand sewing project for a little girl, it is pink and there are beads included with the kit.

                    Displaying IMG_0412.JPG

I think Miriam is pleased with the purse, it is the perfect racoon holder, her mom says. The racoon is the latest of her favourite stuffed animals. She's wearing that particularly cute look she has, she is a little doll that girl. When Miriam saw her mom hanging some fabric up to dry, she asked "why do you keep going to the fabric store without me?"

Rebecca is making great strides with her sewing. In less than two weeks, she has made a dress for Miriam, one for herself, matching skirts for mom and Miriam, and another skirt for mum.
And now a Vogue blouse! I was particularly chuffed when she emailed today that she is loving making flat-felled seams. I think she might be hooked.

This is extremely satisfying to me, that she has discovered sewing and is loving it.

I am also slightly jealous of the Texas weather. Bare arms and bare feet! Here it is plus 6 Celsius (42 Fahrenheit) which is pretty good for February but I am longing for an early spring.


Sunday, February 26, 2017

Landscape Quilting


Lunch with a sewing friend re-introduced me to her husband's landscape quilts. Bob had overheard a program that Brenda was watching and he was intrigued. Never one to hesitate, Bob immediately began researching the topic, ordered the book Landscape Quilting, and commenced on his first landscape quilt.

Now, about five years later, Bob has made dozens of quilted wall-hangings which he gifts to friends, hangs in his home (discreetly, never over the top), and continues to develop his art.

I don't know why we are captivated by certain things at certain times in our life and not in others, but that is the way it seems to happen. I was completely intrigued by Bob's quilted art, and after a few emails with Brenda, some video watching on the internet, I headed to the fabric store and bought a selection of quilting cottons, then to Staples to get glue sticks and permanent markers.

For my first attempt at this, I decided to copy or try to copy the wall hanging of birches in this video.

http://wpt.org/SewingWithNancy/Video/beginning-landscape-quilting-part-one

There is a lot to learn, but I think the learning curve will be steep and quick. Just what I like.


I am not overly pleased with the background fabric, but it will have to do. I wanted something that looked more like an overcast sky with more light in it, but the selection at the store wasn't that great. I can also see that the background shrubbery needs some work. As Nancy Zeiman says, you need more fabrics to add dimension, so the addition of some more greenery should do the trick. And perhaps a splash of some yellow flowers there too.

I was not at first pleased with the trees; I had one fabric to use but it seemed so dark, then I realised I could use the wrong side. So the tree on the right is the right side of the fabric; the one on the left is the wrong side.  But they do not begin to look like trees until you get the markers out and start outlining the edges with either black or silver markers.  For the tree on the left, I darkened it with the silver marker and for the tree on the right, I lightened it with the same marker, after having outlined the edges with the black marker.  Then adding the little branches was lots of fun. Those are simply drawn on with black marker, squiggling the marker as you draw it across the fabric.

I have lots of leaves to add, yellow and green, and those are cut carefully and will take some time. Then they are also marked with the markers to make veins. After all of that is done, the piece is backed with quilt backing, and a complementary fabric for the backing and the free-motion machine quilting is done. 


Leaves added. Perhaps I need more, not sure at this point. I think the groundcover needs some work, it is too monotone and needs some flecks of colour in it. 

I have done stippling before and actually love it. So I am looking forward to that part of this project. I don't think I will do small stippling on this, but will do larger free motion stitching across the sky in the shape of clouds, and then outline stitching on the tree trunks and branches. Each leaf will be stitched, plus then some straight line stitching to resemble grass in the undergrowth. 

I think I am hooked. I can already see the stash for this beginning to explode. Because you purchase about 6 or 7 fabrics for one piece (or more), but use so little, there is loads of fabric left over for another project. And there will be more. This is a lot of fun. I have always wished that I could paint but my artistic ability with a brush is pathetic; however I can see that, with this craft, you can let the fabric dictate where you go and all you need is patience, scissors, glue, and some inspiration. If you don't like some aspect of it, add more fabric. And it is all removable because it is simply tacked down with paper glue until you permanently stitch it. 

Nancy Zeiman has three videos for this technique. Simply put in two or three at the end of the URL to get to the next one in the series. What a great lady she is. 

And thanks to Bob and Brenda for the inspiration that they have given me.


Saturday, February 18, 2017

Shirt Duo


This is my first version of Simplicity 1538. Made up in a poly/cotton shirting blend from the local fabric store. It kind of looks like a man's shirt, except for the feminine buttons. 
From this version, I learned that I cannot skip the broad back alteration as I had some pulls in the back yoke that seemed to indicate I needed extra width there.


Image result for simplicity 1538
 This is version #2. I bought a stretch cotton shirting from Emma One Sock about a month ago, and wanted to add some contrast similar to the pattern above. This was the result of getting the advice from a lovely woman who works at Fabricville. She is a quilter and has a wonderful gift for putting fabrics together. I asked her how she knows what will work.

She had a couple of tips. One is the scale of the print, you need to keep them similar. For instance, I had a polka dot cotton picked out and she said the polka dot was too large for this printed shirting. Another fabric she said had too  much contrast in the colour, it was too sharp.  The original shirting had a muted look to it, so she picked out a couple of quilting cottons that might work and then we eliminated them until we had this one. I think she is a genius and told her that I hope the manager realises this and gives her more scope in her job there. For instance, she could be a wonderful window dresser instead of just cutting fabric for customers.


I put the contrast on the yoke, the collar, the cuffs and the front bands.


The pattern calls for a ribbon to be sewn down the button band, but I simply cut a narrow strip of the shirting and folded it so that it was about 1/2" wide.


There is one more version of this shirt to come. The fabric was also chosen by my newly found friend at Fabricville. I had chosen a vintage cotton print in lovely tones of pale mauve and yellow and she found a contrasting yellow made by the same manufacturer so it matches perfectly.

I was saving this fabric combo until I got the fitting just right on this shirt. It is definitely my go-to shirt pattern now.

Too bad that Simplicity patterns aren't sold in Canada. Apparently they aren't allowed into the country because they lack a French translation of the instructions. Bah!  what a silly excuse to ban the patterns. New Look suffers the same fate apparently.