Saturday, July 15, 2017

Sewing Swimwear


For some reason, I got it in my head that I wanted to make a bathing suit. The idea took over and I searched for a pattern that would be suitable for this aging body. Aha! Butterick 5795 popped up and, although the photos were not that helpful, the line diagrams showed a "swimdress" that I could see myself wearing. 

                                        Image result for butterick 5795

The pattern has a lot of options: a crossover swimsuit, a tank top in two lengths with a swimsuit bottom, a skirt to wear over the bottom if desired, and a cover-up dress that looks quite good too.

I found this print at our local fabric store, the fabric is heavy duty nylon/lycra and it was pricey, especially when I discovered that I had cut the bottoms on the wrong grain and had to purchase more. In actual fact, I then found out that it was only the lining that I had cut wrong and the lining restricted the stretch of the print; once I cut lining with the correct stretch, everything was fine. 


I made the shorter version of the swim dress, the bottoms are pinned to the dress form because I couldn't get them up over the bottom of the stand without losing the feet (of the dress form that is). 


Rather than use the directions for the lining, I cut the front double and zigzagged purchased bra cups in the correct position. Then I simply sewed the lining to the edges of the front and treated them as one layer. That is why you can see the side seam pulling to the front; it is the elastic sewn underneath the bra cups that pulls in the lining which is attached at the side seam. It doesn't do this when I am wearing it.


This is the back view; it has a slight flare to it. The longer version would be more flared. When I tried this on, I actually thought it would make a very nice princess line dress in a knit with some body. I may actually try one later on, but I would raise the neckline and finish it with binding or a facing.  I think I would add sleeves to it as well. 

All in all, I am quite pleased with this swimsuit. Of course, one never really knows until you actually swim in it, because there can be surprises with swimwear. The swimdress may float up and be totally annoying; I should know in two weeks time when we have moved to Ontario and I take my first dip in Lake Kamaniskeg (I can hardly wait).

I have sewn two dresses this summer plus a top, but haven't posted any of that. We are intensely busy with selling this house, packing up and getting ready to leave this province. Thirty-one years is a long time and we are going back to our original province, now that Nick has retired. 

I plan on sewing one more blouse, then the sewing room will be packed up and the machines packed and ready for the big move. 


Friday, May 19, 2017

Moving and Gardening


Preparing for a big move in July or August from Nova Scotia to Ontario. I am thrilled at the fact that we now have a large lot that is great for gardening. The hardiness zone is more limiting, this is zone 3 whereas Halifax is zone 4, but the soil is clay whereas Nova Scotia is rock and more rock, as well as giant tree roots.

So first up, I just had to plant a flowering crab apple tree. So easy to dig a foot-deep hole with this soil, add the sheep manure to the soil, apply the fungus to the exposed roots (apparently it helps the roots to grow and to absorb moisture), add bone meal to the soil as well and then plant. Water generously and I'm done!


Apparently the apple tree in the empty lot next door will provide the cross-pollination required. So I don't have to plant a second apple tree. Which is a bit of a relief, I am rather tired by the effort to plant this one. 

I have also discovered four peonies in one of the garden beds. And the daffodils I planted last fall are just about finished. There is a perfect spot for a clematis vine just by the back deck (feet in shade, tops in the sun), this is something I could never grow in Halifax. I am going to push my luck though and see if I can get a climbing hydrangea to grow here. It is one zone colder than hydrangea needs, but in the right spot it just might make it. 

Next week, it is back to Nova  Scotia to finish packing up the house and then selling it. Once that is done, we will move here permanently. The move will bring us within a 5-minute drive of 7 of our grandchildren which will be great. And travel to Texas to visit the other 3 grandchildren is easier from Ontario than from Nova Scotia. The only drawback is leaving our youngest daughter in Nova Scotia. We will only see her when she takes her vacation and visits us here.


 This is the view of the front yard as seen from the front steps. This is what we see out of our living room window. In the fall, the colours are magnificent with the red maple and the golden leaves of the many birch trees.


This is one angle of the back yard, the lot line defined by large pine trees, which the neighbour emphatically informed me belonged to him. "I can trim the branches if you would like", he said. I replied "they are just fine the way they are." 


The other angle of the back yard. This is the land of sheds, almost everyone has at least one in their yard and often as many as three or four. Provides great storage for wood piles, bikes, snowmobiles, ATVs, boats, and possibly racoons and their young.

Life will be different here. I am looking forward to it. I know that I will miss terribly some things about Halifax and the closest fabric store is an hour's drive away and it's not terribly impressive. I will definitely be shopping online for many fabrics and notions. But life will also be much simpler, living in a town of 1200 people rather than a city of 100,000. There doesn't seem to be that sense of urgency that you feel when you live in a city, always watching the clock because you are on a schedule. I feel that we will be living more in the moment here. 

All in all, a good move we think. As with any major change, there will be a period of adjustment. 
I am very grateful for all the blessings in my life.


Tuesday, April 18, 2017

McCalls 7360


I made this top last spring in a linen printed fabric and was really pleased with it. However, when they tell you to prewash linen 3X, take the advice. The top shrunk after the first wash and is no longer wearable, well not by me.  I made a second version in a black tencel fabric, it is okay but it doesn't really thrill me.  But I still liked the pattern and got it out last week for a third version. This time in a batik rayon in the most gorgeous shades of blue and purple.


I did add more darts to the front from the waist as I found the FBA had made this too loose in the waist area. And perhaps it would be better 1" shorter, but this is good to go. I will hand wash this top to preserve the fabric for as long as possible. If you can get your hands on Eucalan fabric wash, don't hesitate, it is great stuff, you simply swish a capful into a sink of warm water, add the garment and let it soak for 15 minutes or so. Then squeeze it out gently, no need to rinse, and hang to dry. I did this with a rayon blouse from another Batik Butik fabric and I wore it pretty steadily for 8 years.

So another version of this top is up next. This time, I have a drapey fabric that I can't remember where I got it. It must have a lot of rayon in it because of the drape, but I don't think it is 100% rayon. It might be mixed with some polyester or with cotton.


This time, I will make the sleeveless version with the longer back hemline.
Alterations to this pattern include:
Cut size 18
Make a full bust alteration adding 1 1/2" to each front piece, and making a rather large side bust dart
Extend the length of the top by 1" (even though I am short, I find many tops are just too short, I prefer a longer length)
Make the top full button front rather than tab opening. Cut pockets, yoke and front bands on the bias.

My third version shows that I need to raise the end of the bust dart by 1", which will be done on this fourth version. I don't think I have ever made 4 versions of any pattern in my life.

I am finding it difficult to get much extended sewing time in these days, as we are preparing to sell our house with a move across provinces in July. So much to do to declutter the house, which is a four-storey 100-year old home. After 21 years and six people living here, there is a lot to go through and discard, recycle, rehome, whatever. I have been forced to cull a lot of my fabric stash and patterns too, and the local thrift shop has got a lot of these. One woman at the sewing guild said I see you brought your patterns to the Sally Anne. When I checked, they were all gone. I guess there are some sew-ers out there.

Next week will see another driving trip of 1000 miles to Ontario where my husband will lead his last geological field trip of his career. This is a bittersweet time for him, as he has loved teaching and retirement is not coming easy for him.

I am hoping that he will teach at the small college where we are moving, and that he can introduce a new crop of students to the subject that he loves.


Thursday, March 2, 2017

Sewing through the generations


My oldest daughter Rebecca who lives in Texas is learning to sew. And with the internet, there is so much at hand now that we did not have when we started out sewing.

Her daughter Miriam watches mommy sewing and I thought perhaps she might like to try something herself. So I saw a little purse on Amazon, a hand sewing project for a little girl, it is pink and there are beads included with the kit.

                    Displaying IMG_0412.JPG

I think Miriam is pleased with the purse, it is the perfect racoon holder, her mom says. The racoon is the latest of her favourite stuffed animals. She's wearing that particularly cute look she has, she is a little doll that girl. When Miriam saw her mom hanging some fabric up to dry, she asked "why do you keep going to the fabric store without me?"

Rebecca is making great strides with her sewing. In less than two weeks, she has made a dress for Miriam, one for herself, matching skirts for mom and Miriam, and another skirt for mum.
And now a Vogue blouse! I was particularly chuffed when she emailed today that she is loving making flat-felled seams. I think she might be hooked.

This is extremely satisfying to me, that she has discovered sewing and is loving it.

I am also slightly jealous of the Texas weather. Bare arms and bare feet! Here it is plus 6 Celsius (42 Fahrenheit) which is pretty good for February but I am longing for an early spring.


Sunday, February 26, 2017

Landscape Quilting


Lunch with a sewing friend re-introduced me to her husband's landscape quilts. Bob had overheard a program that Brenda was watching and he was intrigued. Never one to hesitate, Bob immediately began researching the topic, ordered the book Landscape Quilting, and commenced on his first landscape quilt.

Now, about five years later, Bob has made dozens of quilted wall-hangings which he gifts to friends, hangs in his home (discreetly, never over the top), and continues to develop his art.

I don't know why we are captivated by certain things at certain times in our life and not in others, but that is the way it seems to happen. I was completely intrigued by Bob's quilted art, and after a few emails with Brenda, some video watching on the internet, I headed to the fabric store and bought a selection of quilting cottons, then to Staples to get glue sticks and permanent markers.

For my first attempt at this, I decided to copy or try to copy the wall hanging of birches in this video.

http://wpt.org/SewingWithNancy/Video/beginning-landscape-quilting-part-one

There is a lot to learn, but I think the learning curve will be steep and quick. Just what I like.


I am not overly pleased with the background fabric, but it will have to do. I wanted something that looked more like an overcast sky with more light in it, but the selection at the store wasn't that great. I can also see that the background shrubbery needs some work. As Nancy Zeiman says, you need more fabrics to add dimension, so the addition of some more greenery should do the trick. And perhaps a splash of some yellow flowers there too.

I was not at first pleased with the trees; I had one fabric to use but it seemed so dark, then I realised I could use the wrong side. So the tree on the right is the right side of the fabric; the one on the left is the wrong side.  But they do not begin to look like trees until you get the markers out and start outlining the edges with either black or silver markers.  For the tree on the left, I darkened it with the silver marker and for the tree on the right, I lightened it with the same marker, after having outlined the edges with the black marker.  Then adding the little branches was lots of fun. Those are simply drawn on with black marker, squiggling the marker as you draw it across the fabric.

I have lots of leaves to add, yellow and green, and those are cut carefully and will take some time. Then they are also marked with the markers to make veins. After all of that is done, the piece is backed with quilt backing, and a complementary fabric for the backing and the free-motion machine quilting is done. 


Leaves added. Perhaps I need more, not sure at this point. I think the groundcover needs some work, it is too monotone and needs some flecks of colour in it. 

I have done stippling before and actually love it. So I am looking forward to that part of this project. I don't think I will do small stippling on this, but will do larger free motion stitching across the sky in the shape of clouds, and then outline stitching on the tree trunks and branches. Each leaf will be stitched, plus then some straight line stitching to resemble grass in the undergrowth. 

I think I am hooked. I can already see the stash for this beginning to explode. Because you purchase about 6 or 7 fabrics for one piece (or more), but use so little, there is loads of fabric left over for another project. And there will be more. This is a lot of fun. I have always wished that I could paint but my artistic ability with a brush is pathetic; however I can see that, with this craft, you can let the fabric dictate where you go and all you need is patience, scissors, glue, and some inspiration. If you don't like some aspect of it, add more fabric. And it is all removable because it is simply tacked down with paper glue until you permanently stitch it. 

Nancy Zeiman has three videos for this technique. Simply put in two or three at the end of the URL to get to the next one in the series. What a great lady she is. 

And thanks to Bob and Brenda for the inspiration that they have given me.


Saturday, February 18, 2017

Shirt Duo


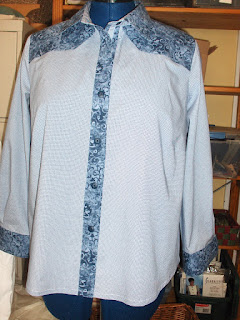
This is my first version of Simplicity 1538. Made up in a poly/cotton shirting blend from the local fabric store. It kind of looks like a man's shirt, except for the feminine buttons. 
From this version, I learned that I cannot skip the broad back alteration as I had some pulls in the back yoke that seemed to indicate I needed extra width there.


Image result for simplicity 1538
 This is version #2. I bought a stretch cotton shirting from Emma One Sock about a month ago, and wanted to add some contrast similar to the pattern above. This was the result of getting the advice from a lovely woman who works at Fabricville. She is a quilter and has a wonderful gift for putting fabrics together. I asked her how she knows what will work.

She had a couple of tips. One is the scale of the print, you need to keep them similar. For instance, I had a polka dot cotton picked out and she said the polka dot was too large for this printed shirting. Another fabric she said had too  much contrast in the colour, it was too sharp.  The original shirting had a muted look to it, so she picked out a couple of quilting cottons that might work and then we eliminated them until we had this one. I think she is a genius and told her that I hope the manager realises this and gives her more scope in her job there. For instance, she could be a wonderful window dresser instead of just cutting fabric for customers.


I put the contrast on the yoke, the collar, the cuffs and the front bands.


The pattern calls for a ribbon to be sewn down the button band, but I simply cut a narrow strip of the shirting and folded it so that it was about 1/2" wide.


There is one more version of this shirt to come. The fabric was also chosen by my newly found friend at Fabricville. I had chosen a vintage cotton print in lovely tones of pale mauve and yellow and she found a contrasting yellow made by the same manufacturer so it matches perfectly.

I was saving this fabric combo until I got the fitting just right on this shirt. It is definitely my go-to shirt pattern now.

Too bad that Simplicity patterns aren't sold in Canada. Apparently they aren't allowed into the country because they lack a French translation of the instructions. Bah!  what a silly excuse to ban the patterns. New Look suffers the same fate apparently. 


Tuesday, January 31, 2017

Knitting Projects


A sweater for grand-daughter Hannah - this is called Granny's Favourite by Georgie Hallam. Downloaded from Ravelry. Knit in Cascade Superwash Wool in a double-knit weight. This was a very nice sweater to knit, and I even learned how to knit the sleeves on circular needles using the Magic Loop method.


I found the lacy pattern on the yoke easy to do, and then the rest of the sweater is plain stocking stitch. It did get kind of boring, but it is a good project to have on the needles when you are watching movies. 


My only concern is with the washing of this sweater. Since Hannah is one of 7 children, there are loads and loads of laundry and everything gets tossed in together. I think I will warn her to keep this sweater separate and I will wash it for her when it is required. Although it is washable, I don't think it will survive the grueling laundry in her household. The other alternative might be to put it into a mesh laundry bag to keep it from getting stretched out too much.


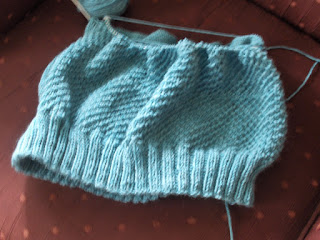
And on the needles now is this sweater.
The Harvey Pullover by Hannah Baker and in the Interweave Knits fall issue, also available as a download on Ravelry.
http://www.ravelry.com/patterns/library/harvey-pullover-2


I am knitting this in the recommended yarn, also my favourite yarn, Cascade 220 a pure wool worsted weight. I chose a heathered turquoise and bought it, sight unseen, from www.yarnforward.ca

When it arrived, it seemed a little washed out in colour to me, but it has grown on me and I am really liking it now. I don't usually knit pullovers and am not even sure how much I will wear it. But with an upcoming move to Ontario this summer, the seasons are different than Nova Scotia and I anticipate this will get worn come fall, especially since we will have a new dog that needs lots of walking.

This is also knit in the round and the front of the sweater is done in a Brioche stitch which is really pretty. Only four rows to the pattern, so not too hard to commit to memory and this can be knit while TV watching.


Saturday, January 28, 2017

McCalls 7470


From Palmer Pletsch patterns, McCalls 7470 offers a tailored shirt with front and back princess lines, a shirt-dress and the option of sleeves or sleeveless. 

Image result for mccalls 7470


I tissue-fitted this pattern as I did the previous knit top, following Pati's order of alterations. An alteration for high round back (3/8" at CB tapering to nothing at the shoulder seam). Then altered for a broad back, adding 1" to the back by setting it 1/2" away from the fold. Then a full bust alteration, spreading the pattern 1 1/2" which gives a total of 3" across the front. 

The result is a wee bit snug through the waist and hip area, but a good fit in the shoulders and bust. (Weight Watchers better kick in here). I didn't follow the instructions for the collar and band, preferring to use the burrito method for a nice finish. Somehow I goofed on the collar band and for some reason, I matched the band to the shirt at the wrong place and wondered why I had a hard time getting the band to fit the neckline. I ended up trimming off the band and just going with it as is. After all, I was treating this version as a muslin for fit, and used some cotton check that was in the stash. What I was aiming for was to get a good pattern for a princess-line shirt and dress. And now I know what needs to be done with this pattern. So it is being laid aside for that summer denim dress that will be so nice to wear.

One thing I noticed about this pattern and must remember is that there is too much ease in the sleeve cap. I will reduce that in the next version. Shirt sleeves should not require as much easing as these did.


Also I can see that I could gain the extra ease needed at waist and hips by letting out those princess seams in the back. I am straight at the waistline and don't need the shaping that this pattern provides. It does look nice though in the photo, even if I am not shaped like that.

I am on a shirt kick and am now making up Simplicity 1538.

                                        Image result for simplicity 1538
I compared this pattern with the McCalls 7470 and could make the exact same alterations to this one. High round back, broad back and then an FBA. As this shirt has straight side seams, it should provide the extra ease at the waist and hip area that I need.

There is something very satisfying about sewing shirts, they have the lovely details that I so enjoy sewing. I see lots of possibilities for this pattern, especially in print mixing. I bought a vintage cotton print yesterday and the lovely clerk at the store found me a second print that would work perfectly with it to give some contrast in the front band, collar and cuffs. How nice to find a fabric store clerk who has an eye for colour.

I google patterns now before sewing them to see who else has made the pattern and to get tips and inspirations. I was pleasantly surprised to find this shirt was on Lucky Lucille's blog, a blog that I really enjoy. She did it in a flamingo print and used black and white gingham as the contrast. Such a nice shirt. Just check out her extra bit of pink trim on the side of the band with the buttons.

http://luckylucille.com/2014/07/flamingos-and-gingham/

She has also made it up in the sleeveless version, but my favourite is her flamingo and gingham one.


Sunday, January 8, 2017

Pattern Alterations - there is always something new to learn


Since shortly after Christmas, I have been under the weather with this virus that is going around, a long cold that hangs on and hangs on. So last week, since I couldn't do much except sit around, I treated myself to a couple of classes on Craftsy.

I chose two fitting classes with Pati Palmer and her daughter Melissa Watson. One is for fitting shirts and tops, the other for fitting knit tops. This is not new material to me, but having this in a video format is a new way of learning. I decided to actually take a pattern and follow their instructions to the letter and see what the results would be.

I chose The Fearless Tee from Material Things, an old t-shirt pattern that I have used for years with success. I wondered if I could improve upon the fit.

                                                     Fearless T-Shirt 

First up, I went down a size, using my high bust measurement to select the size. As Pati explained, when patterns were first produced, the bust meant that measurement above the bust. She said think of a sculpture of a "bust" and that is what was meant by a bust. The measurement that we take of our full bust is actual a measurement of our breasts. Huh, that made sense to me. And if you read the disclaimer in pattern catalogs, they will tell you to pick the size by your upper bust measurement unless there is less than 2" difference between high bust and bust, because then either measurement will put you into the same size.

So down a size I went, which meant that there was no way this pattern would go around my body.
On to a tissue fitting, following the order specified in the video. First off, I saw something new to me: the need for a high round back alteration. I didn't know I needed one, but it became obvious that I did. I also needed a broad back alteration as the tissue would not reach to my center back.

So I altered the upper back, slashing the pattern and spreading it 3/8" at CB and coming back to nothing at the armhole. Then I slashed the pattern through the shoulder seam right down to the lower edge and spread it 1/2"  Another fitting with the tissue and I was amazed. The back now fit but what amazed me was that my shoulder seam was now straight. I have been troubled by a weird shoulder seam for years, but it is the reverse of all the fitting books. Rather than having to alter the seam at the armhole edge, my seam was pulling toward the back at the neck edge. Adding 3/8" to the high round back released that area and the shoulder seam was now sitting right on the top of my shoulder where it should be.

Altering the front was easy; I needed a full bust alteration of 1 1/4" to provide enough circumference so that the centre front would meet my center front. And this meant I now had a bust dart added to the pattern. As Pati says, if you buy a $200 designer t-shirt, it will have a bust dart in it. If you don't like the appearance of a dart in a knit, she advises trimming the dart legs to 1/4" and pressing it up, rather than down. I did all of this and the only remaining alteration was to shorten the dart by 1/2" as it was too close to my apex.

I sewed up the new altered pattern in a bamboo knit that I bought last year from Blackbird Fabrics. The fit was good, it could be a little tighter in the front but that is easily fixed by sewing deeper side seams.

I decided to compare the new altered pattern with the one I had been previously using, which was the same pattern, but in one size larger. At first, the differences don't appear that big. But they are significant. First off, I have a shorter shoulder seam, which is good. The new back is slighter wider in the armhole area than the old pattern, and the broad back alteration makes the entire back larger from the armhole down. Previously I had been sizing up both front and back to make this fit.
The new front is narrower in the armhole area, which is an improvement. I often find bagginess in garments in this area. The FBA gives me the added room at the side seam, without making the rest of the tee larger.

The finished results mean that I now choose the large size in this pattern, with 1/2" more in the back, and 1 1/2" more at the front side seams with extra length. Using the extra large size did give me the circumference that I needed but not in the correct areas. Basically I am a smaller size in the back than in the front, it would appear. You know, I should have seen this previously as I can recognize this in my youngest daughter who seems to have inherited my upper body. She is short-waisted with a full bust and a broad back. I can easily see that in her, but it took this tissue-fitting to see this in myself.

So the new alterations do indeed give the room where it is needed. So rather than just getting a pattern to fit around me, the alterations have given me a pattern that is narrower where required, broader where required, and gives the extra length to the front that a full bust requires.

I am impressed with the results and am now going to use this pattern along with the cowl from Sewaholic's Renfrew Top to give a different look in a similar weight knit.

I am eagerly awaiting the materials to arrive that accompany the course; each course gives you a pattern and the fitting manual; you also have access to the video as much as you wish to watch it.
I will wait for the blouse pattern to arrive to make the alterations to that and then I will tackle the princess-line shirt that I wish to make into a tried-and-true pattern.

Many thanks to Pati Palmer and to Melissa for their efforts with this video. I know that Pati has been fitting a bazillion bodies for the past 45 years and her experience is evident. She is now passing that knowledge along to her daughter Melissa who seems to have the same love for fit and sewing that her mother has.